Table of Contents
The chief priestess is an Electro catalyst that has a unique kit and different play styles. Yae specializes in dealing Electro damage while being off-field. Not only that, rotating her to come back and deal damage through her Elemental Burst.
At release, Yae was deemed by some of the community members as a weak five-star. However, this is mainly because her kit is a bit more complicated and she requires more understanding to work optimally. Here you can learn how to optimize her build to reach her peak performance!
Skills
Normal Attack: Spiritfox Sin-Eater
Yae attacks up to three times dealing Electro damage. Holding the attack will consume stamina and cast an AOE Electro attack in a straight line. Most builds and comps depend on her other skills, making this skill the least priority in leveling up.
Elemental Skill: Yakan Evocation: Sesshou Sakura
Yae dashes and leaves an Electro totem that deals Electro damage to nearby enemies. If there are nearby totems, the totems will link and increase their levels. Higher levels will increase each totem’s damage.
This skill has three charges, meaning that the highest level for totems is three. However, at the second constellation, the highest level becomes four. One thing to note is that those totems cannot be stacked on top of each other, since casting a totem very close to another breaks the older one.
Another thing to note is that the dash direction is controllable by casting the skill while walking in the desired direction. Having three totems up is the most important thing in Yae’s kit and is very essential in her comp. This is why this skill has the highest priority in leveling up.
Elemental Burst: Great Secret Art: Tenko Kenshin
Yae unleashes an AOE Electro thunderbolt and destroys all present totems. For each destroyed totem, the thunderbolt will be followed by an extra thunderbolt. The thunderbolts resulting from destroying totems deal more damage than the first thunderbolt.
This skill is important to understand since it deals massive damage but has certain limitations. Those limitations are the totem destructions, high energy cost, and cooldown. Each limitation will be addressed accordingly.
Passive: The Shrine’s Sacred Shade
For each totem destroyed, one charge of the totems is reset. Due to this passive, it’s better to always destroy all three totems to maximize the damage of the Elemental Burst while completely regaining all three totems.
2nd Passive: Enlightened Blessing
Yae’s totem’s damage is increased by 0.15% of her elemental mastery.
Weapons
Kagura’s Verity
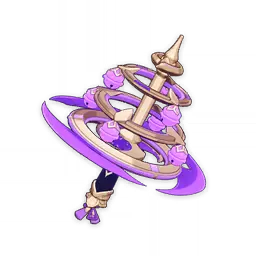
Yae’s ascension provides her with a 19.2% crit rate. Thus, this weapon’s high crit damage can do wonders to her damage. Not only that, but it can also greatly boost Yae’s totems due to its passive.
Casting the three totems will increase Yae’s Elemental Skill damage by 36% while increasing her elemental damage by 12% as well. In damage comparison, Kagura’s verity outdamages all other books consistently.
Oathsworn Eye
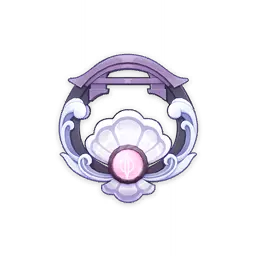
Oathsworn eye gives a great attack boost to Yae from its base attack and attack percentage buff. Not only that, it gives 48% energy recharge after casting an Elemental Skill. This is the most important stat for Yae, which makes this weapon amazing for her especially since it is given for free.
The Widsith

While being a four-star catalyst, Widsith can actually deal damage close to Kugara’s verity if not more in some instances. However, this requires that Widsith be refinement level 5, and within its buff, which lasts for 10 seconds, with 30 seconds cooldown. Moreover, the damage varies depending on which of the three buffs is given, with the 120% attack being the best.
Artifacts
Unfortunately for Yae, there isn’t a dedicated 4-piece set that works perfectly for her. The closest set she has is Thundersoother. However, this is an extremely situational set that can only be used in a mono Electro Comp. In that comp, the only element used is Electro, where Thundersoother increases damage on enemies affected by electro by 35%. The same applies to Thundering Fury where she requires specific comps.
Thus, the best approach is to mix two different sets based on the stats required and availability. So far, the most important stat for Yae is energy recharge. Thus, Emblem of severed fate can be the best set to have if not a must.
The second set can be switched between Gladiator’s finale/Shimenawa’s reminiscence and Thundering fury. All of them can deal relatively the same damage. However, Shimenawa’s reminiscence can be farmed in the same dungeon with Emblem of severed fate so it can be easier to obtain.
Build: Emblem of Severed Fate + Shimenawa’s Reminiscence
| Flower | Plume | Sands | Goblet | Circlet | Substats |
|---|---|---|---|---|---|
| 1. HP | 1. ATK | 1. ATK % | 1. Electro DMG % | 1. Crit DMG % or Crit Rate % | 1. Energy Recharge 2. Crit DMG % 3. Crit Rate % 4. ATK % |
Also Read: Best Settings For Genshin Impact: Get The Highest Performance And Graphics.
Build: Gladiator’s Finale/shimenawa’s Reminiscence and Thundering Fury
| Flower | Plume | Sands | Goblet | Circlet | Substats |
|---|---|---|---|---|---|
| 1. HP | 1. ATK | 1. Energy Recharge or ATK% | 1. Electro DMG % | 1. Crit DMG % or Crit Rate % | 1. Energy Recharge 2. Crit DMG % 3. Crit Rate % 4. ATK % |
Team Comps
In terms of team composition, Yae can work with different team comps, mainly being taser team, Mono Electro team or overload team. The taser team is all about using Electro and Hydro elements together in an Electro-charge reaction. Electro-charge deals damage over time and spread to nearby wet enemies.
Meanwhile, Mono Electro is a comp where the only element applied is Electro. It makes use of Thundersoother’s bonus damage along with Yae to deal tons of damage. The team consists of Raiden, Yae, Fischl, or C6 Sara and Bennett. Finally, the Overload team with a Pyro damage dealer along with Yae.
Raiden Shogun

Raiden and Yae work well together both in lore and in team comps. Mainly since Yae has the highest cost, of 90, in the game so far, and Raiden can help her recharge a lot faster. Not only that, Yae’s high cost can make Raiden’s Burst deal massive damage.
Also Read: Best Raiden Shogun Build: Weapons, Artifacts & Team Comps.
Raiden can also be paired with other supports and Thundersoother on Yae to become an absolute monster.
Sara Kujou

Sara can boost active members attack by using her Elemental Skill or Elemental Burst. Moreover, at C6, the attack boost is coupled with a 60% crit damage, which works greatly well with Yae since she passively has 19.2% crit rate, and crit more often.
Kazuha

Kazuha is almost essential in using the taser team with Yae. Infusing him with Hydro will make sure enemies are constantly wet, making the Electro-charged reaction a lot easier and reach all enemies.
Also Read: Best Kazuha Build: Weapons, Artifacts & Team Comps
Yoimiya

With Yoimiya’s Elemental Skill, her normal attacks become Pyro infused. The constant Pyro application along with Yae’s totems can apply Overload multiple times. The time needed to set up the totems can be done while Yoimiya’s cooldown is recharging, making them complement each other.
Xiangling

Xiangling can be a good replacement for Yoimiya, especially against immobile enemies. Her Elemental Burst, along with the totems can be a doom station. Not only that, the attack buff Gouba provides along with their kits can provide massive damage.
Bennett

Bennett is one of those characters that’s always nice to have. His heal and attack boost can help Yae deal more damage while sustaining her. However, it’s important to note that his attack buff does not affect the totems if Yae is tagged out or outside his buff.
Also Read: Best Bennett Build: Weapons, Artifacts & Team Comps.
Constellation
| Yakan offering | For every extra thunderbolt caused by totem destruction, Yae will restore 8 particles to herself |
| Fox’s mooncall | Totems start at level two and their maximum level becomes four. Moreover, they gain 60% range |
| The seven glamours | Increases the level of the Elemental Skill by 3 and the maximum level to 15 |
| Sakura channeling | When the totems hit opponents, nearby allies gain 20% Electro bonus for 5 seconds. |
| Mischievous teasing | Increases the level of the Elemental Burst by 3 and the maximum level to 15 |
| Forbidden art: daisesshou | Totem attacks will ignore 60% of enemies defense |
Yae is one of the characters that do not require constellation to perform well. However, each constellation is very helpful to her. However, her second constellation is the best of them all. The totem level up increases their damage significantly. Moreover, the range increase is extremely useful against mobile enemies.
Overall, Yae is a unique character with a complex kit. Nonetheless, she is a versatile five-star that can work in different comps if set up properly. With proper understanding, she can shine well and show her true strength that has the same power as the other five stars.
All image copyrights belong to Mihoyo, Genshin Impact fandom, and Genshin honeyhunterworld.
